The Blog Ben Writes

about code

About Trie-ing (Part 2)

Implementing a Trie in Ruby

In my last post I talked about benefits, reasons, and potential pitfalls of using tries. For a quick refresher, a trie, often called a prefix-tree is a a data type that is great to use for matching string patterns. Check out the wikipedia article for more info. For this post I will talk about how to implement a trie in Ruby.

The Groundwork

The first thing we want to do to build this trie is set up a Trie class that can initialize with a specialized nested hash. Since this will the actual data structure of the trie we can call it tree

1
2
3
4
5
6
7
8
9
class Trie

   attr_accessor :tree

   def initialize
      self.tree = Hash.new{ |h,k| h[k]=Hash.new(&h.default_proc) }
   end
  #...
end

When we call Trie.new the above code will initialze a new instance of Trie with an instance variable tree. We build our nested hash specifically so that when we try to access a key in it, if the key is present we will get the value of that key, but if the key is not present then a new key-value pair will be added to the hash. When a new pair is added, the key will be the value we tried to access and the value will be an empty hash. This would normally only work on the first level of our hash, but since we want to build empty hashes this way no matter how deep our nesting goes we can call default_proc (which returns any block passed to Hash.new for a specific instance of Hash) as a proc on Hash.new in the block we first provided to Hash.new so that each new hash created on access is built with the same functionality.

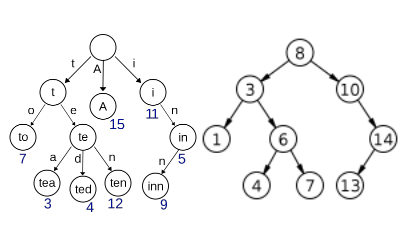
Now, when we add characters to our custom nested hash in a specific way we will get a trie structure with each key pointing to a value that is a hash of the next character in the string. Below is an example for the strings “cat” and “car”.

1
2
3
4
5
6
7
8
9
10
tree = Hash.new{ |h,k| h[k]=Hash.new(&h.default_proc) }

tree["c"]             #=> {}
tree                  #=> {"c"=>{}}
tree["c"]["a"]        #=> {} 
tree                  #=> {"c"=>{"a"=>{}}}
tree["c"]["a"]["t"]   #=> {}
tree                  #=> {"c"=>{"a"=>{"t"=>{}}}} 
tree["c"]["a"]["r"]   #=> {}
tree                  #=> {"c"=>{"a"=>{"t"=>{}, "r"=>{}}}} 

Inserting Strings

Since we now have a nested hash functioning like we want the next step is to build a method that can add a string to our tree. I’ll call this method #insert and it must take a string like "cat" and access each section of the string independently (tree["c"]["a"]["t"]) just like above.

1
2
3
4
5
6
def insert(word)
  characters = word.split("")
  pointer = self.tree
  characters[0..-2].each{ |char| pointer = pointer[char] }
  pointer = pointer[characters.last][true]
end

The first thing we do after isolating the characters in the argument string is to set up a variable pointer. pointer is set to the current state of self.tree (starting with {}). Then in the next line we loop through all but the last character in our characters array. For each character we set our pointer to the return value of that key. If that character is in our tree in that position, the pointer will move to the the value of that key and if that character is not present at that level of the tree then an empty hash will be created as the value and pointer will be moved to that hash, in which the next character of the string will be nested.

After all but the last characters are added we add the last character followed by the key true. We will later use this true to check that we have reached the end of a word in our trie.

Finding Matches

Once we add all the words to trie we need check what words have been added so we can build a method called match which will take a string and return true or false depending on weather the word is in our trie.

1
2
3
4
5
6
7
def match(word)
  characters = word.split("")
  pointer = self.tree
  characters.each { |char| pointer = pointer.fetch(char, nil) rescue nil }
  result = pointer.fetch(true, nil) rescue nil
  result == {} ? true : false
end

match works similarly insert but in reverse. First we split the argument into characters (like in insert), then we set a variable called pointer to the current state of our tree (also like in insert), and then we loop through all the characters setting pointer to the return value of calling fetch on pointer for each character. We also rescue nil for this line and the next so that we will not get errors in instances where characters are not found in tree.

We use fetch here in order to set a default return of nil when we try to fetch an invalid key instead of getting an error, or creating a new empty hash, which would have happened had we used the tree["c"] syntax with a non-present key. After the loop terminates pointer points to tree.fetch(characters.last, nil) so we call fetch(true, nil) on the last character to make sure that the word ends at that point in the trie. If it does we get {} and if not we get nil. We then compare our result to {} and return the proper true/false value.

Next Steps

After building a simple Trie in Ruby I want to end by listing a few next steps for this code.

  • Partial match support - Partial match support would be a very useful tool for a trie. A method like partial_match(substring) that could return all words in the trie containing the provided substring would be useful for finding similarity instead of indenticlal matches
  • Wildcard Support - A method that could take a string containing designated wildcard characters and return true or false for matches would be useful for finding pattern segments
  • Initialize with strings - Creating a trie that could initialize with an array of strings would make adding strings and could be accomplished with an add_multiple_strings(array) method that leveradges the * operator or just takes an array argument.
  • Javascript - Implementing a trie in Javascript would be very useful and could be used as a look up for custom predictive text in searches and many other features.

About Trie-ing (Part 1)

I recently had the chance to work on a problem involving string pattern matching. One of my favorite aspects of programming is solving these sorts of algorithmic puzzles so I quite enjoyed working on this problem.

After working out my first solution involving lots of nested loops I decided to research a bit I came accross the Trie data structure. A trie can look very similar to a regular binary search tree as seen below (Trie: left Binary Tree: right) however there a few key differences.

Although tries use a tree like structure they are different from a normal binary search trees for several reasons.

  • Each descendent of a node all share a common prefix like “i” for “in” and “inn” in the above example. Because of this tries are often called “Prefix Trees”

  • No node in the trie stores any key associated with that particular node, instead the location of the node in the tree defines what key with which each node is associated.

So now that we know that a trie is sufficently different from a regular binary search tree

Benefits

  • Looking up data in a trie is faster than looking up data in an imperfect hash table ( O(m) with m being the length of the search string vs. O(N) )
    • An imperfect hash table is one with key collisions, instances in which the hash function maps different keys to the same position in a hash
    • Take a look at here to see why this is a problem in hashe’s and how they get around it
  • A trie will not contain any key colisions
  • Trie Buckets are only necessary if there are multiple values associated with the same key
  • Adding and deleting items from a trie is simple

Drawbacks

  • Trie lookups can take a longer time if the trie is stored on a hard disk and not in virtual memory
  • Some tries require more space than equivelent hash tables
  • Certain keys, like foating point numbers, do not provide much meaning and must be used with the Bitwise Trie implementation

So Why a Trie?

Tries are great for matching full and parital string patterns and can be used for predictive text, autocomplete, and even spell check. The matching algorithm is so good in a trie because the strings are organized by prefix, so a large amount of potentially searchable data can be safely ignored with just the first letter of a search term.

Given a trie matching function trie.match("tea") on the below trie(same as above but represented differently) only branches with the parent prefix “t” will be searched, which safely eliminates anything without that prefix.

1
2
3
4
5
6
7
{:root=>
  {"t"=>
    {true=>{},
     "o"=>{true=>{}},
     "e"=>{true=>{}, "a"=>{true=>{}}, "d"=>{true=>{}}, "n"=>{true=>{}}}},
   "A"=>{true=>{}},
   "i"=>{true=>{}, "n"=>{true=>{}, "n"=>{true=>{}}}}}}

Implementaions

In my next post I will build a simple trie implementation in Ruby.

Alternatively, if you cannot wait you can use the Trie Gem, one of the many Node packages, or whatever library you find best.

About Using Jasmine

I have been working on a Backbone.js project for a few days now and while it has been great I came accross one very annoying issue. After getting my environment set up, a quick hello world out of the way, and some Jasmine tests written I opened up my terminal and stared blankly for a few minutes before it hit methat I didn’t know how to run them Jasmine tests. I had the proper source files and dependencies but just didn’t know how to actually run my tests.

After looking on google for a while I decided to refactor my test suite use the Jasmine Standalone release which I would have done originally had I not expected the the testing suite to just work, like it does in rails.

I download the standalone bundle and was able to pull the necessary source files into my project’s directory, set up an index.html in my spec directory, and began to require all the relevant scripts. At that point I decided I wanted a better way. I talked to some friends and was told that I should just use the Jasmine Gem. Since I had only used this gem with with Rails and gems-in-general with Ruby I didn’t think to use it for a strictly JavaScript project.

Using the Jasmine gem is extremely simple if you have a Ruby environment set up on your computer. Once you install the gem just navigate to the root of your project and type these two commands:

1
2
jasmine init
jasmine examples

If this is done properly you will get a notice saying “Jasmine has been installed” and instructions to run the server with the command rake jasmine and that you can run the automated CI tasks with PhantomJS by calling rake jasmine::ci.

More specifically jasmine init will add the following files and directories to your project.

  • spec will contain all of your spec files and spec specific requirements
  • spec/javascripts which holds
    • helpers an empty directory you will later use for helper scripts (jasmine examples will add one)
    • support holding jasmine.yml which will handle your requirements and jasmine.helper.rb where you can override and default configuration options like the port numbers
  • rakefile which by default will require the jasmine rake tasks for starting the testing server and more but can be used to write more tasks

jasmine examples will add more directories and files to your project that you can use as a boilerplate for building your own tests. It will install:

  • spec/helpers/jasmine_examples/spec_helper.js a file you can use for setting up callbacks for your tests
  • spec/jasmine_examples/PlayerSpec.js an example spec file for Player
  • publica directory contianing two JavaScript objects that are tested by PlayerSpec.js

Now, if you type rake jasmine and visit http://localhost:8888/ (the default port for the python server you launch with rake jasmine) you will see the passing tests for PlayerSpec.js.

Now that we have the dummy tests running we can set up the requirements for dependencies in jasmine.yml. This file contains comments telling you where to require what and it already has everything you need to run the tests generated by jasmine examples and any tests that you write in the spec directory the gem builds however, if if you are using anything other than vanilla JavaScript like I was, you will need to manually require some files. You can use wildecards and regex to require specific groups of files in directories (e.g. js/**/*.js will require in all javascript files in all child directories directly nested under the js directory) however this may not load scripts in the order that you need so it will still be necessary to require certain files manually. For example, if you are using backbone lib/underscore.js will need to be required before lib/backbone.js manually even if you have lib/*.js the src_files section of jasmine.yml.

If some of your tests aren’t working and you think that some files aren’t being required properly you can manually check the page by running the server (rake jasmine) and opening the console to see what isn’t being loaded properly. If there are errors in your files they will show up in the console. Since it is JavaScript it runs in the browser and all of the files you need for testing should be there.

This is not the most difficult thing in the world, and frankly, if you are using anything like yeoman or are adept at bower you will probably not need this, but if you want to bring some jasmine tests into a small application without much overhead I found this gem to be a great solution.

About Ruby Proxy Class

It’s not so amazing how life always seems to keep just slightly away from writing, but not recently! So here is a post about Proxy Classes in Ruby.

I came accross the topic while going through the Ruby Koans this morning and since I had never heard of this pattern before I thought, “Let’s get writing!”

What is a Proxy Class?

Proxy Class is a code pattern in Ruby and is simply using a class to interface with something else(It is completely important to note that this is different from Java Interfaces which I will not talk about here). In Ruby, it helps me to think of the proxy class pattern as a technique to create wrappers for other classes that can add new functionality and/or change normal functionality.

Why Use This Pattern?

If you read the above description, and thought, “Sure” then you can just skip to the examples. If not, you probably want to know why you might do this. You can use this pattern to add your own functionality to a class you created to give it different functions in certain circumstances or more likely to change a standard Ruby class, like array, without monkey patching the class and creating potential problems with your code. If you are looking for examples you you don’t need to get very obscure. Active Record use this pattern to design their associations!

If you would like a more simple example however In the below code we set up the a Proxy Class for an array of names.

1
2
3
4
5
6
7
8
9
10
11
12
13
14
15
class NamesProxyArray
  def initialize(arr)
    @arr = arr
  end

  private
    def method_missing(method, *args, &block)
      @arr.send(method, *args, &block)
    end
end

special_array = NamesProxyArray.new(%w[Alex Birtha Christopher Mark Thomas Sally Jessica Steve])

special_array.size #=> 8
special_array.shuffle #=> ["Thomas", "Christopher", "Steve", "Sally", "Jessica", "Alex", "Birtha", "Mark"] 

Above, we recreate the functionality of Ruby Array by redefining method_missing. We use the send method to take any method unknown to the NamesProxyArray in this case size and shuffle and call them on the array object that is in this instance of Proxy Class we made. This is the cornerstone for setting up our proxy. After hijacking into method_missing, any method that we don’t define or that is not part of the default Ruby Class Object will be called on Array instead of NamesProxyArray.

Now that we have access to the regular Array methods we can start to add new functionality. In the below code we will redefine the shuffle method and add a new method called get_first_letter.

1
2
3
4
5
6
7
8
9
10
11
12
13
14
15
16
17
18
19
20
21
22
23
24
25
26
27
28
class NamesProxyArray
  def initialize(arr)
    @arr = arr
  end

  def shuffle
    @arr.map do |item|
      item.chars.shuffle.join
    end
  end

  def get_first_letter
    @arr.map do |item|
      item.chars[0]
    end
  end

  private
    def method_missing(method, *args, &block)
      @arr.send(method, *args, &block)
    end
end

special_array = NamesProxyArray.new(%w[Alex Birtha Christopher Mark Thomas Sally Jessica Steve])

special_array.size #=> 8
special_array.shuffle #=> ["Axel", "hiartB", "iCsrtrhpoeh", "Mrka", "osmaTh", "lylaS", "eJssaci", "etvSe"]
special_array.get_first_letter #=> ["A", "B", "C", "M", "T", "S", "J", "S"]

Now we have two new methods! A redefined shuffle and a new get_first_letter. By defining shuffle in NamesProxyArray method_missing is not longer called and the method is evaluated in our Proxy Class instance and we don’t have to worry about breaking shuffle any where else in our code. get_first_letter works like any other instance method and any standard array method like size, as long as they are undefined in ProxyClass still get evaluated on the regualar Array class. All this happens without having to modify the class Array at all!

Ruby’s Proxy Class pattern can be used to really make your code your own. You can modify any of the standard ruby objects to work your way without actually changing them! Additionally it helped me to get more comfortable using patterns in my day to day code.

About Class_eval and Instance_eval

This afternoon I took the time to reread my old blog…

I then took less time to delete the whole thing and restart it since if something is worth doing it is worth doing well.

For the first post in my new blog I will write about the Ruby methods: class_eval and instance_eval. I can think of no way more metaphorically flavorful of getting into a good headspace to write!

These methods are meta and a bit odd so to start, in plain English, class_eval lets a programmer evaluate code within the scope of a class and instance_eval lets a programmer evaluate code on a class object.

Here is how they look:

class_eval

1
2
3
4
5
6
7
8
9
10
11
12
13
class Meal
end

breakfast = Meal.new
breakfast.eat_pancakes # NoMethodError

Meal.class_eval do
  def eat_pancakes
    "Mmmmm Pancakes!"
  end
end

breakfast.eat_pancakes # "Mmmmm Pancakes!"

The first time we call breakfast.eat_pancakes we get a NoMethodError. class Meal is empty and this is what we expect. The second time it is called after we use class_eval to pass a block to the meal class defining the eat_pancakes method. We then get a return value of “Mmmmm Pancakes!”. We get this without changing the original code for the Meal class. We can use class_eval to add the an instance method to a class at any point in a program runtime!

instance_eval

1
2
3
4
5
6
7
8
9
10
11
12
13
class Meal
  def eat_pancakes
    "Mmmmm Pancakes!"
  end
end

Meal.instance_eval do
  def breakfast?
    true
  end
end

Meal.breakfast? # true

In the above code Meal.breakfast? returns true after we use instance_eval to add the appropriate class method. This is where things get confusing. In the above example of class_eval we added the instance method eat_pancakes and in the example for instance_eval we added the class method breakfast?. So why are they not named the other way around?

  • class_eval is a method from Ruby’s Module Class and thus acts on a module or class and evaluates the block it is pased in the scope of that class. Thus when we define a method in that scope with def eat_pancakes we create an instance method the same way we would had it been within the original class syntax.
  • instance_eval however is a method from Ruby’s Object Class and the block we pass to it is evaluated on the class object. Then when we write def breakfast? in the block it is evaluated on the class object and runs as a class method rather than in the class as an instance method!

So you may look at these methods and think, “Cool! But who cares?” and that’s probably fine, I only used instance_eval once and it was to change an initialize method to give class instances a different name depending on how they were created. While I quickly refactore this away I still think it was a fun way to solve the problem.

Moving forward will you use this method? If you are really into metaprogramming then yes, you probably will, but if not? Who cares, they fun methods to play with and can help you think about the ruby object model in a new way.